
September 15, 2008
Before I get in with the main subject matter of the September Issue of Scale Modelers Tips and Tools Monthly...
Announcing the opening of the Scale Modelers Handbook

We have partnered with my favorite site for buying almost anything online Amazon.com. This dates back several years as I found it to be a favorite source for books on almost any subject.
Amazon has developed some amazing tools to help shoppers of any ilk and I have pared down their vast library of products for different shops in the virtual modeler's mall. Inside you will find shops devoted to RC Car Racing, Radio Control Boats, Warships and RC Plane and helicopters.
Turn another corner and you'll find Plastic model Airliners and Planes, a shop for plastic ship models, the Plastic Model Car Garage, and a range for plastic military models.
Duck down another corridor and you'll find the Model Paint Brush rack, a Hobby Knife shop, an Airbrush store and the Dremel Rotary Tool Crib.
My primary requirements for entry into the mall was good value for the dollar, I have gotten some good deals); a business concerned about the safety and security of customers; minimal shipping charges (Free Shipping (it works) is easy by combining orders)and effective customer service I have tried myself.
Take a few moments and wonder around the Hobby Mall.
Dioramas Recreate Moments In Time
Dioramas are a 3-D "shutter click" on a scene the modeler likely has not other way of glimpsing due to time, distance, or accessibility constraints.He or she creates a diorama by rolling out some allied skills that may not have come into play in the model build:
Research: Pick a milestone in the subject of your model and gather the information you will need to create a 3-D replica. What types of trees surround the scene, what is the condition of structures at this pregnant moment. How about the condition of the subject itself, what weathering will your model need?
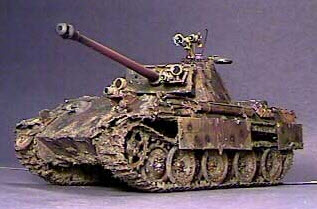
Dioramas have been built using almost any model as the centerpiece from planes to cars, from ships, to trains, they can all be plugged into a scene.

Below is another diorama that is a bit different:

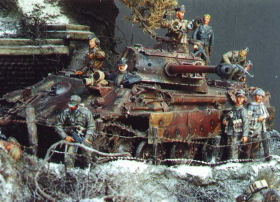
The Last Panther in Pomerania
by Rhodes WilliamsI wished to create something in this setting that was not only of interest from all sides but also one having a significant change in its elevation from front to back. Dioramas which tend to catch my eye or those which aren't just a plank with some groundwork. I love to see something which is truly artistic utilizing both architecture and landscape.
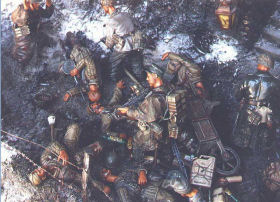
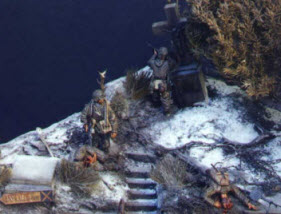
The beauty of the Pomeranian Project (two years in the making) is the variety of small vignettes, each a scene of its own. Here are four of them.
 |
 |
 |
 |
When you are planning a diorama, it is a good idea to let your terrain move beyond the 2-dimensional plane (sometimes it would be plain) and let your scene have its ups and downs. Adding height an depth to your plan gives you space to add smaller vignettes that relate to the main scene but are a distance away.
Multiple mini-scenes involving other people (military or civilian) adds wider interest for the viewer.
Modelers often place a diorama in a shoebox to provide added depth. I encourage you "Think outside the box"
 For instance, this diorama of the RMS Titanic sinking puts you right at the scene, yet David Bakker, the creator, only used a half-inch of green tinted polyester to create the water.
There is a collapsed lifeboat in the foreground with survivors clinging to it. The Titanic's lights can be seen glowing under the surface.
Tips For Your Next Diorama Creation
Always have a story to your diorama - Dioramas that make the most impact to the people that look at them is a clear story. This simple rule goes a long way towards making your diorama a commanding attention grabber.Make sure your diorama has one focal point of interest that will almost instantly convey the action or message. It is okay to have smaller vignettes that relate to the main focal point, but be sure your central point has the impact to make it stand out.
The majority of the military models I have seen are displayed in a diorama depicting an action scene. Here is how to bring yours to life:
1. Pick a model you would like to build based on detail and your modeling aspirations.
2. Research the subject itself through the Internet and libraries where you can find historical references with lots of pictures.
3. Develop a plan and sketch the scene. As you draw you will find ideas seem to flow onto the paper.
4. Now that you have the kit and a rough idea of the scene you intend to depict select a base size and material.
5. Rough in the terrain using plaster of paris or putty. Usually these scenes are small enough so a frame won't be necessary.
6. To model trees for your scene, start by going for a walk and watch for weeds that have the shape of a miniature tree. and then coat their "limbs" and leave base with dried spices (parsley, Thyme, Oregano) from the kitchen cabinet or Dollar Store.
7. Use modeling clay to carve scale stumps and fallen limbs for your scene.
8. Add your own ground cover from dried and crumbled (a kitchen blender works fine) and then spread on your painted groundwork.
9. Use digital cameras, your computer printer and cardstock to create man made structures and damaged building sections
10. Consider bringing your scene "to life" by adding a model railroading smoke generator for a still smoldering effect
Creating A Water Diorama Staying Dry
We can learn a lot from watching others create, specially if we have the advantage of being able to repeat watching.That makes the case for videos in your newsletter as you have it available for as long as you want.
This particular video is in spoken Japanese, but being able to watch a master create this diorama before your eyes...well, hopefully, a lot will rub off.
I found I was able to concentrate on what he was doing better by muting the audio:
A Really Big Mod...er, Diorama
I watched Titanic again last week looking for an instance where the movie set would shine through. Even knowing it was there and concentrating on the smallest miscue, I couldn’t see a single sign that this wasn’t the ship that lays 1,200 feet below the Atlantic’s surface.It was a remarkable piece of engineering mixed with masterful construction.
The combined efforts of a massive team of artists, craftsmen and engineers would recreate a nearly full-size, 775-foot long exterior shooting set of Titanic as well as the seven-acre, 17-million-gallon seawater tank in which to sink her.
With masterful planning, the extraordinary challenge of readying production of "Titanic" in Mexico was realized in a remarkably short period of time. Construction on the Fox Baja Studios began May 30, 1996 on a 40-acre beach front parcel of land.
The state-of-the-art facility featured a 17-million-gallon exterior tank, a 5-million-gallon interior tank housed in a 32,000-square-foot sound stage and three traditional stages.
The studio also included production offices, set/prop storage, a grip/electric building, welding/fabrication workshops, dressing rooms and a number of ancillary support structures. A scant 100 days after ground-breaking, principal photography began. And looming majestically against the breathtaking Mexican coastline was the 775-foot exterior set of Titanic, standing 45-feet from the water line to the boat deck floor, its four distinctive funnels towering another 54-feet against a timeless horizon. Titanic sailed again.
Producer Jon Landau says the decision to build the largest shooting tank in the world, as well as additional filming stages in Rosarito, was made after a global search from Poland to the United Kingdom to Malta to Australia and throughout the U.S. and Canada..
"No single existing site in the world could contain the scale of our production and the attendant facilities that were required to film the scenes that Jim Cameron envisioned," Landau says. "In order to support the scope of the film and to be able to facilitate both interior and exterior production, it was more efficient to custom-build it all in one place."
The "ship" was actually a wood-covered framework that was constructed in a tank dug specifically for the movie on a lot south of Rosarito Beach, Mexico. Even then, only one side of the ship was completed. Few of the interiors were built into the framework itself...those were built in sound stages that were located adjacent to the large tank. A smaller tank (most notable used for the lifeboat sequences) was also built, enclosed within its own sound stage.
The large exterior pieces (the majority of the ship and the bow section) were designed to be raised and lowered into the water in the large tank. During this process, much of the plywood that covered the steel framework and formed pieces of deck gear became waterlogged and warped.
By the end of filming, so much damage had been done to the structure of the set that for safety reasons, it had to be dismantled. Much of the debris was thrown away, but a good portion of that was scavenged by people who had an interest in the movie, its topic, or in making some money. Same thing went for the relatively few interiors that were required to be submerged or otherwise inundated with water.
Here is the construction process from start to finish, be sure to take notes.
NOTE: Not Suitable For A Workbench Build
Words of wisdom from military manuals
'If the enemy is in range, so are you.' - Infantry Journal-----------------------------------------------------
'It is generally inadvisable to eject directly over the area you just bombed.' - U.S.Air Force Manual
------------------------------------------------------
'Whoever said the pen is mightier than the sword obviously never encountered automatic weapons.' - General Macarthur
-----------------------------------------------------
'You, you, and you ... Panic. The rest of you, come with me.' - U.S. Marine Corp Gunnery Sgt.
------------------------------------------------------
'Tracers work both ways.' - U.S. Army Ordnance
- -----------------------------------------------------
'Five second fuses only last three seconds.' - Infantry Journal
-------------------------------------------------------
'Any ship can be a minesweeper. Once.'
------------------------------------------------------
'Never tell the Platoon Sergeant you have nothing to do.' - Unknown Marine Recruit
-------------------------------------------------------
'If you see a bomb technician running, follow him.' - USAF Ammo Troop
-------------------------------------------------------
'Though I Fly Through the Valley of Death, I Shall Fear No Evil. For I am at 80,000 Feet and Climbing.' - At the entrance to the old SR-71 operating base Kadena , Japan
-------------------------------------------------------
'You've never been lost until you've been lost at Mach 3.' - Paul F. Crickmore (test pilot)
-------------------------------------------------------
'The only time you have too much fuel is when you're on fire.'
-------------------------------------------------------
'If the wings are traveling faster than the fuselage, it's probably a helicopter -- and therefore, unsafe.'
-------------------------------------------------------
'When one engine fails on a twin-engine airplane you always have enough power left to get you to the scene of the crash.'
-------------------------------------------------------
'Without ammunition, the USAF would be just another expensive flying club.'
-------------------------------------------------------
'What is the similarity between air traffic controllers and pilots? If a pilot screws up, the pilot dies; If ATC screws up, .... The pilot dies.'
-------------------------------------------------------
'Never trade luck for skill.'
-------------------------------------------------------
'Airspeed, altitude and brains. Two are always needed to successfully complete the flight.'
-------------------------------------------------------
'Mankind has a perfect record in aviation; we never left one up there!'
-------------------------------------------------------
'Flying the airplane is more important than radioing your plight to a person on the ground incapable of understanding or doing anything about it.'
--------------------------------------------------------
'The Piper Cub is the safest airplane in the world; it can just barely kill you.' - Attributed to Max Stanley (Northrop test pilot)
-------------------------------------------------------
'There is no reason to fly through a thunderstorm in peacetime.' - Sign over squadron ops desk at Davis-Monthan AFB, AZ, 1970
---------------------------------------------------------
'If something hasn't broken on your helicopter, it's about to.'
---------------------------------------------------------
'You know that your landing gear is up and locked when it takes full power to taxi to the terminal.'
--------------------------------------------------------------
As the test pilot climbs out of the experimental aircraft, having torn off the wings and tail in the crash landing, the crash truck arrives, the rescuer sees a bloodied pilot and asks 'What happened?'.
The pilot's reply: 'I don't know, I just got here myself!' - Attributed to Ray Crandell (Lockheed test pilot).
Painting Tip: Refining the Tin Palette
A few weeks back I disclosed a use for expired candy tins, the Life Saver Fruit Tart type, using them as a mixing palette for acrylic hobby paints.Acrylics are handy for model painting as they clean up and thin with water. The problem is they dry so fast, they dry on your palette wasting paint and your time.
I found a painting tip that improves the tin palette by keeping the paint (acrylic) moist and ready for use, hours, even days after mixing.
That beats the "use-it-in-20-minutes" or forget it scenario. You go through the difficulty of mixing a special shade, get distracted from its application and find it has skinned over...solid.
Worse, after it dries and you need to finish the job by matching the mix, you have a whole new problem.
That's why I like the "wet palette". It is inexpensive and easy to use.
To make your own wet palette, you will need:
• A Life Savers Fruit Tart tin
• 2 oval compressed sponges and
• A sheet of Sta-Wet "Handy Palette" acrylic paper (Available in refill packs at AC Moore or Michaels).
You can get oval compressed sponges through beauty supply companies, beauty salons or you can find them online.
Now put it together:
1. Eat the candy tarts.
2. Fill the tin half full with water.
3. drop in a compressed sponge and let it suck up the water.
4. Put the second sponge on top and give it enough water to fill.
5. Cut a circle the size of the tin and hold it under the warm water tap until both sides are thoroughly wetted.
Now you have a wet palette.
Just put a drop of paint on the top of the wet Sta-Wet palette. It will remains usable as long as your sponge will deliver humidity to the paper. This means, for as long as your Fruit Tart Tin is at least half filled with water the paint will stay moist.
If the sheet starts to dry, or dried as the water evaporated because of several days to air exposure, just repeat previous steps 2 to 5, with exception of step 3.
I like to use a separate circle of StaWet for each color and I keep them (after they have dried) in a ZipLock bag for use at a later date.