
|
Detail Painting in HO or N
|
Like any other form of modeling, a good finish makes or breaks your end result. It all starts at the beginning with careful preparation and plenty of patience to let things dry.
• Clean them—Make sure your castings are clean. If you have latex rubber gloves, use them. The oil in your skin will be your biggest problem.
• Scrub them with warm soapy water, a toothbrush is really helpful. Rinse them and leave them to dry.
• Pickle them in a vinegar rinse to rid your castings of the mold release material. You can again use a toothbrush. The vinegar will also give the metal castings “tooth” (not for the toothbrush but to allow paint to adhere more readily).
• As a final step I like to spray mine with a coat of clear, acrylic sealer to act as a primer and will allow your paint to spread evenly without the need for a second coat..
• Tongue Depressors—Adhere your subject casting(s) to the end of a tongue depressor to handle during the painting process. I like to use a non permanent paste like dental adhesive or even rubber cement to bind the detail item to the end of a tongue depressor, yet it is easily removed.
• Painting is another area—where time spent practicing will be rewarded with the final look. It will improve your results and since it is usually the first thing visitors see of your favorite model. This is an area where getting as close as you can to perfection will pay off for years to come. Use some ingenuity with your practice—drill yourself on painting in tight places, start with an 8-pane N-Scale window and paint the frame around each “pane” a different color.
• Generally acrylics are friendlier than enamels which expose users to a toxic fume environment. Enamels offer a harder clean-up environment and you need turpentine or something stronger to clean-up and thin your paint. With acrylics, you use straight water.
Obviously, the smaller these detail parts or figures get (HO. N Scale and even Z Scale) the more difficult it becomes to paint.
But there are some tricks, er, techniques that can make your life easier with little ones. We'll call them Theorems:
| Theorem# 1 Windex makes a good acrylic paint eraser. It will allow you to start over when needed. | It really helps if you can do your painting while you have the subject on a spru.When that is not possible you can attach your detail to craftsticks using Aleene's Tacky Glue. This really helps keep the oil on your fingers from fouling your paint job. |
I recently came across a website which showed me an entirely (at least to me) figure painting methodology I hope to try on N Scale figures.
Brian William Knott Fayle a retired Diagnostic Radiologist in Ontario provides this site at http://www.brifayle.ca/1home.html.
He describes some techniques he utilizes in figure painting which give his model people a distinctive, almost live look.
| Theorem# 2 Shadows make all the difference. Look for shadows at the edges of clothing, others in the folds. | There are two keys to the Fayles method of figure painting 1. He uses black paint as the primer. The vertical edges of the clothing provide the depth by forming pseudo-shadows. |
We need to clarify these two concepts; shadow differences and the Vertical Edge as they can even be used to enhance painted figures.
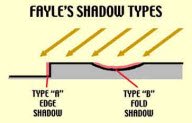 Fayles attempted to simplify the shadow business and eventually decided there are two basic types. The key one is the Type "A", or "Vertical Edge", Shadow shown on the left. The Type "B", or "Fold", Shadow on the right is not as important but does play a part. Start looking at people, or photos of figures, and start analysing their shadows.
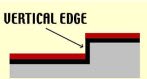
This is what Fayles calls the "vertical edge" which is the key to the whole technique that he discusses. It is this black area that gives the impression of depth by forming pseudo-shadows. Whilst I have shown the two flat planes to be the same color, they could just as well be different. It is vitally important that the paint you use is not thin enough to run down over this edge.
Take a good look at people in different lighting and you will see that they have inumerable edge shadows on them. I cannot stress enough the importance of looking at the prototype to see how well this technique mimics the look.

SBI!
