
|
How To Build Ship Model Plastic Kit
You’ll be a lot happier if you deal with the manufacturing imperfections before you begin your creative work.
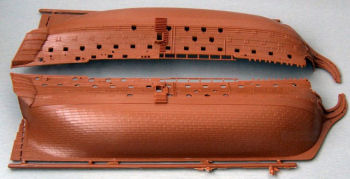
1. Inventory your kit with two objectives in mind; making sure all parts are present and observing the overall condition: note all the flaws the parts have – mold lines, pin holes, sink and swirl marks, warpage, and flash, 2. Deal with any issues from the first step. If you need parts, contact the manufacturer and expect a delay for delivery. Most manufacturers will help you deal with missing part issues. If you need to correct flaws, do it now before doing any painting or removal from the trees. Do Your Modeling On A Versatile Table
How To Build The Wrong Way 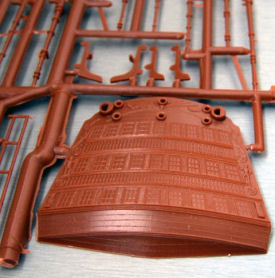
Mold lines These are very small raised lines on hull pieces, running along sides of a mast or over raised portions. Some are more pronounced than others. The more recent plastic kits have been improved and, you will have hard time finding mold lines. They are easily removed with fine sandpaper or sanding sticks. Pinholes You will find these small round holes in the plastic, caused by the pins that push the part from the mold. In newer kits these marks have been eliminated or are in concealed spots. Try test fitting the parts to see if the pinhole(s) can be hidden. If so, sand the surface smooth. If it is deep enough, fill it with putty or body filler, and then sand smooth once the filler is dry. Sink marks Most are depressions in the plastic flat surfaces like decking caused by plastic shrinking while it’s cooling. They can be any shape or form. These should be filled and carefully block-sanded before spraying primer.
A Baker's Dozen Tips On Working With Plastic
Warpage This occurs when hot plastic parts are dropped into a box and deformed under their own weight or weight of other parts. Basically, it’s a part that has wrong shape or is twisted. If the warpage is minimal, you can try to fix it with hot air from the hair dryer. Warm the part by blowing hot air on it, and carefully and slowly bend it into correct shape, then wait till plastic cools off. It should hold new shape. When the body is seriously warped, you can try the following (and this is not recommended for children under 14 or should be supervised by adults) method: boil some water, take it off the fire, and let it sit for few minutes. Then briefly dip warped part in the water, and quickly remove it. Then bend it to shape, and hold until plastic cools off. Safety Note: Keep in mind that after you pull the part out of the (almost) boiling water, it will be extremely hot. Please wear gloves or other hand protection while handling the part.
Adding Remote Control Movement to Ship Models Once all the small imperfections are fixed, it is time to start painting, right? Not exactly. In order for paint to stick to the plastic, it needs something to hold on to. The entire model needs to be lightly sanded. Lightly wet-sand the entire body with fine (800-1000 grit) sandpaper. Make sure you wash the body thoroughly with soapy water and old soft toothbrush. Then rinse it for a few minutes under running water, and shake off as much water as you can. Now let the body air-dry for a few hours. Once it is totally dry, you are ready to put on some paint. Tips for Planking Wooden Models Getting it Straight One of the things that used to give me real headaches is painting a waterline around my model until I learned to do it right. Use the blue "no lift" masking tape you get at hardware stores (I raid my wife's painting supplies). Outline the line you are painting without overlaps making all four corners neat and square. Here is the "key trick"--Paint a thin coat of clear, acrylic matte medium between your tape edges (the line you are painting). When this has dried completely, paint the line with the acrylic color of choice. When this has dried, pull up the masking tape and you will find the cleanest line you ever painted. The matte medium fills in the valleys created by the tape paper texture. These valleys give the tape its "no lift" characteristic.
|
 When you open the box you will undoubtedly find the plastic parts large and small molded onto trees and in plastic bags.
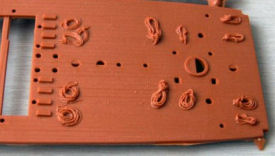 Flash Its the most common defect on plastic parts (especially those produced on old tools), but it is easily fixed. Just cut off the flash with sharp hobby knife, and sand the rest with sandpaper, sanding stick, or needle files.
Modeling Resources


All Four and Save