| Rigging Helper
Aides Model's Tough Task Rigging helper is what I needed when I learned there’s more than one reason that rigging is in the final chapter of most sailing model plan books and tends to be the biggest challenge in tall ship modeling.
A good looking rigging job on a three-masted ship relies on how well you implement the three P's: -
Patience -
Planning -
Persistence Rigging a full-rigged ship is a complex project and you need to embark on it with care and follow a definite procedure. Work from inside to out. |  | That means start with the “standing rigging”, the cordage which holds the masts and yards in place. “Running rigging “ (used to work the sails on full-sized ships) comes next.
But remember, start at deck level and midships, first with standing rigging and then the lines which control the sails. Once these lines are in place move outward. | 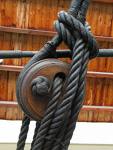 |
| If you try this in reverse you will end up having to attempt to weave the inside lines through the outside to get them into place. This can make a nearly impossible challenge out of a knotty process. I learned this one the hard way with my first USS Constitution model and recovery was difficult at best.
Another thing I did was glue the masts into the deck as soon as I had the deck down (wood ship model instructions are limited at best and this is a technique not covered. It is best to apply as much rigging to a masts as possible while you have them “on the bench” before actually mounting them on your model. | |
The Best Rigging Helper (Steel's Book) Now Online
If you try this in reverse you will end up
having to attempt to weave the inside lines through the outside to get
them into place. This can make a nearly impossible challenge out of a
knotty process. I learned this one the hard way with my first USS
Constitution model and recovery was difficult at best.
Another thing I did was glue the masts into the deck as soon as I had the
deck down (wood ship model instructions are limited at best and this is a
technique not covered. It is best to apply as much rigging to a masts as
possible while you have them “on the bench” before actually mounting them
on your model. |
Rigging Toolkit
|
|
To begin with, you may want to make your own cordage using
a Ropewalk kit or making your own "Easy
Ropewalk" with a variable speed electric drill and eyehooks.
You will find "helping hands" are useful for such tasks as putting strops
around blocks, but not much help when working on the model itself. A
couple of clamps (hemostats) are useful, to attach to the end of a line as
a weight to keep it straight while working on it.
Tweezers are also useful, and a couple of other tools you can make
yourself out of heavy wire - such as coat- hangers, and dowels for
handles:
· Take 3-inch length of coat hanger wire,, mash one end flat, and file a V
in the end -- useful to push ropes;
· Take another, mash the end, and drill a small hole through it (like a
long sewing needle)-- thread a line through the hole to work it through
the rigging;
· Take a third, flatten the end, and file a hook on one side -- useful to
pull a line through the rigging.
Now take a half-inch dowel and cut off 3 three –inch tubes. Drill a hole
in one end to accommodate the end of one of your tools. Press fit with
wood glue. Repeat with the remaining two dowel pieces. |
|
Get In A 'Little' Rigging Practice
Practice drills like the one above can help refine your skills. Rigging any ship or boat can be very tedious but it has been a factor in the life of seamen for over 200 years.
The publication date for “The Elements and Practice of Rigging and Seamanship” above is 1794.
We are always on the lookout for ship modeling educational resources. If you have any that are your favorites, please share them with us.
Add Your Jotting and Help A Modeler
Jot down your Tip That Saved You Time? How About A Technique other scale modelers can use...Share it!
Frankly, these entries help me a lot as there are many modeling genres I know very little about like collecting. I have never had the space.
Feel free to add pictures with our Easy Uploader.
What Other Visitors Have Said
Click below to see contributions from other visitors to this page...
|


